通过实例快速入门Systemtap
我这段时间好好学习了一下Systemtap相关的使用,这篇文章算是学习过程中总结的一些笔记,我另外在github上创建了一个awesome-systemtap-cn项目,收集systemtap相关的优秀学习资源,欢迎提供其他更好的参考资料。
概述
systemtap是一款“动态跟踪(dynamic tracing)”工具,为什么需要这类工具?打一个比方,这类工具就好比医生的听诊器,病人就好比是在运行的系统,很多时候查看一些问题需要在系统在运行的时候来观察,这时候就需要这类动态跟踪工具。与之对应的是,类似gdb这样的调试工具,其工作原理是让进程在某些断点暂停下来,查看进程的行为,这种技术称为“静态调试”。
关于动态跟踪技术,推荐阅读《动态追踪技术漫谈》。

本文旨在通过实例,快速解释systemtap脚本语言的最常见用法和语法。
工作原理
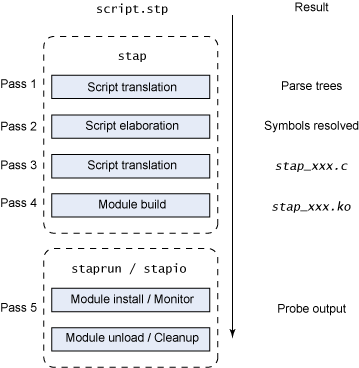
如下图,systemtap使用.stp脚本语言,由命令行stap编译生成对应的内核模块,动态放入内核中执行:

- stap 流程从将脚本转换成解析树开始 (pass 1)。
- 然后使用细化(elaboration)步骤 (pass 2) 中关于当前运行的内核的符号信息解析符号。
- 接下来,转换流程将解析树转换成 C 源代码 (pass 3) 并使用解析后的信息和 tapset 脚本(SystemTap 定义的库,包含有用的功能)。
- stap 的最后步骤是构造使用本地内核模块构建进程的内核模块 (pass 4)。
- 有了可用的内核模块之后,stap 完成了自己的任务,并将控制权交给其他两个实用程序 SystemTap:staprun 和 stapio。这两个实用程序协调工作,负责将模块安装到内核中并将输出发送到 stdout (pass 5)。如果在 shell 中按组合键 Ctrl-C 或脚本退出,将执行清除进程,这将导致卸载模块并退出所有相关的实用程序。
stap命令行参数
-x PID
-x用于传递PID参数给systemtap脚本,这样在脚本内部可以通过target()函数拿到这个传递进来的参数:
// $ sudo stap x-param.stp -x 10
// 输出:pid:10
probe begin
{
  printf("pid:%d\n", target())
}
-T seconds
-T 参数后面可以带上秒数,这样脚本在这个时间之后自动退出,这样可以设置脚本执行的时间。
// $ sudo stap T-params.stp -T 3
// 输出:time:2
global count

probe timer.s(1) {
  count += 1
}

probe end {
  printf("time:%d\n", count)
}
-L和-l
这两个参数大体作用一样,都可以列举出二进制文件对应的函数在哪里(所在文件和行数),所不同的是,-L比-l还多了一些信息:可以打印出函数局部变量的信息。
比如下面这个简单的C代码:
#include <stdio.h>

int func1(int a, int b) {
  return a+b;
}

void func() {
  int a,b,c;

  c = func1(a,b);
  printf("c:%d\n", c);
}

int main() {
  func();
  return 0;
}
使用两个大小写不同的-l参数的输出如下:
$ sudo stap -L 'process("./a.out").function("func")'
process("/home/codedump/source/systemtap-examples/src/a.out").function("func@/home/codedump/source/systemtap-examples/src/test.c:7") $a:int $b:int $c:int

$ sudo stap -l 'process("./a.out").function("func")'
process("/home/codedump/source/systemtap-examples/src/a.out").function("func@/home/codedump/source/systemtap-examples/src/test.c:7")
需要注意的是,要探测的二进制文件必须有调试信息,比如上面的test.c编译出来的a.out文件,需要使用-g参数编译这样才能带上调试信息,否则输出就是这样的:
$ sudo stap -L 'process("./a.out").function("func")'
process("/home/codedump/source/systemtap-examples/src/a.out").function("func")
还要注意的是,有一些编译优化级别可能会把局部变量优化掉,比如上面的文件分别使用O0和O2编译,看到的结果就不一样了:
$ gcc test.c -g -O0
$ sudo stap -L 'process("./a.out").function("func")'
process("/home/codedump/source/systemtap-examples/src/a.out").function("func@/home/codedump/source/systemtap-examples/src/test.c:7") $a:int $b:int $c:int


$ gcc test.c -g -O2
$ sudo stap -L 'process("./a.out").function("func")'
process("/home/codedump/source/systemtap-examples/src/a.out").function("func@/home/codedump/source/systemtap-examples/src/test.c:7")
有了这两个命令行参数,搭配grep命令很容易的查询到相应的探针。
查询应用层程序探针:
$ sudo stap -L 'process("./a.out").function("*")'
process("/home/codedump/source/systemtap-examples/src/a.out").function("__do_global_dtors_aux")
process("/home/codedump/source/systemtap-examples/src/a.out").function("__libc_csu_fini")
process("/home/codedump/source/systemtap-examples/src/a.out").function("__libc_csu_init")
process("/home/codedump/source/systemtap-examples/src/a.out").function("_fini")
process("/home/codedump/source/systemtap-examples/src/a.out").function("_init")
process("/home/codedump/source/systemtap-examples/src/a.out").function("_start")
process("/home/codedump/source/systemtap-examples/src/a.out").function("deregister_tm_clones")
process("/home/codedump/source/systemtap-examples/src/a.out").function("frame_dummy")
process("/home/codedump/source/systemtap-examples/src/a.out").function("func1@/home/codedump/source/systemtap-examples/src/test.c:3") $a:int $b:int
process("/home/codedump/source/systemtap-examples/src/a.out").function("func@/home/codedump/source/systemtap-examples/src/test.c:7") $d:int $n:char const* $a:int $b:int $c:int
process("/home/codedump/source/systemtap-examples/src/a.out").function("main@/home/codedump/source/systemtap-examples/src/test.c:16")
process("/home/codedump/source/systemtap-examples/src/a.out").function("register_tm_clones")
查询内核中包含tcp_的探针:
$ sudo stap -L 'kernel.function("*")' | grep tcp_ | more
kernel.function("__parse_nl_addr@/build/linux-hwe-dAr4iK/linux-hwe-4.15.0/net/ipv4/tcp_metrics.c:785") $addr:struct inetpeer_addr* $hash:unsigned int* $optional:int $v4:int $v6:int
kernel.function("__pskb_trim_head@/build/linux-hwe-dAr4iK/linux-hwe-4.15.0/net/ipv4/tcp_output.c:1398") $skb:struct sk_buff* $len:int
kernel.function("__tcp_ack_snd_check@/build/linux-hwe-dAr4iK/linux-hwe-4.15.0/net/ipv4/tcp_input.c:5062") $sk:struct sock* $ofo_possible:int
kernel.function("__tcp_add_write_queue_tail@/build/linux-hwe-dAr4iK/linux-hwe-4.15.0/include/net/tcp.h:1647")
kernel.function("__tcp_alloc_md5sig_pool@/build/linux-hwe-dAr4iK/linux-hwe-4.15.0/net/ipv4/tcp.c:3371")
-G VAR=VAL
-G命令行参数,可以设置全局变量VAR的值为VAL,相应地就可以作为开关来控制脚本的行为,比如:
// sudo stap G-params.stp -G flag=1
// flag has set
global flag=0

probe begin {
  if (flag == 0) {
    printf("flag not set\n")
  } else {
    printf("flag has set\n")
  }
}
探测点
由于systemtap用于动态跟踪探测,所以首先的第一步就是在语言中定义探测点,在systemtap中被称为“probe”。其基本语法是:
probe event { statement }
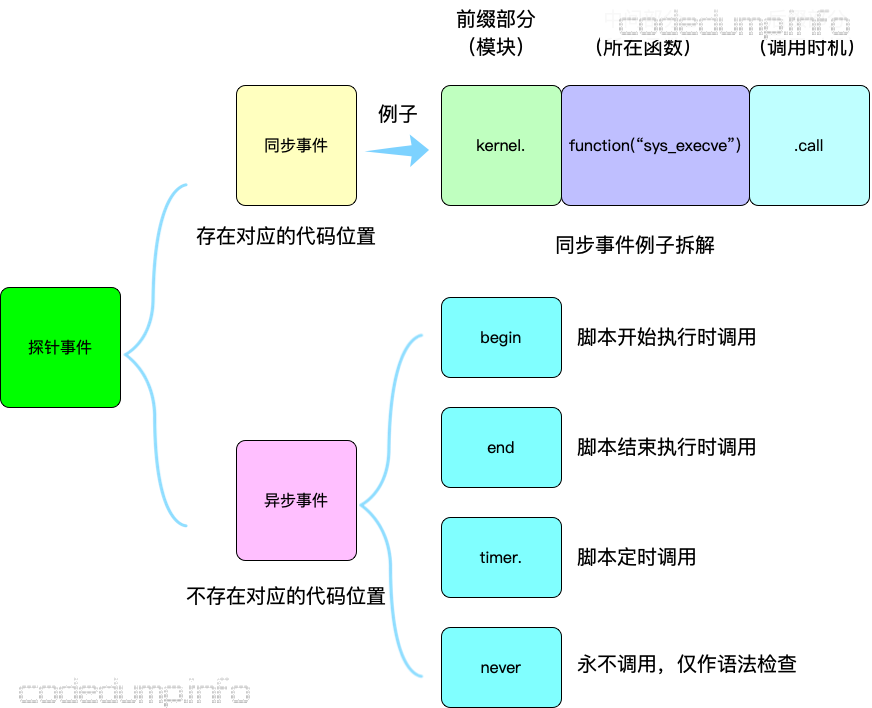
在这里,“event”分为两种:
- 同步事件:发生在进程执行某一条确定的命令时的事件。
- 异步事件:不是执行到指定的指令或代码位置,这一类包括计时器,定时器等。
以下分开解释。
同步事件
同步事件有好多种,同步事件的探测点又分为以下几个组成部分:
- 前缀部分,定义所在的模块:可以是内核,还可以是内核模块,还可以是用户进程,还可以是systemtap在tapset中预定义的探测点。
- 中间部分,定义所在的函数:函数可以通过函数名指定,也可以根据文件名:行号指定。
- 后缀部分,定义调用时机:可以在函数调用时触发,也可以在函数返回时触发。
根据以上几个划分,再来拆解“探测点”就相对容易了。
模块
其中几类的语法分别是:
- 内核:语法为kernel.function(PATTERN),即以“kernel”开头来指定的就是内核中的函数。
- 内核模块:语法为module(MPATTERN).function(PATTERN),即以“module(MPATTERN)”开头来指定的就是内核模块中的函数。
- 用户进程:语法为process(PROCESSPATH).function(PATTERN),即以“process(PROCESSPATH)”开头来指定的就是用户进程的函数。
- 异步调用的模块:比如begin、end、timer等。
- 如果不是以上的格式,那么大概率就是systemtap自带的tapset中已经定义的探测点,实际上这些还是封装了以上几种调用的别名(alias)探测点,后面将谈到探测点的别名定义。tapset于systemtap的意义,就好比libc库于C程序的意义。
所在的函数
所在的函数,可以通过两种方式指定:
- function(PATTERN)
- statement(PATTERN)
PATTERN由三部分组成:
- 函数名(必填)。
- @文件名:选填。
- 如果存在“@文件名”的情况下,还可以选填行号。
即PATTERN的格式是:
func[@file][:linenumber]
在这里,函数名这部分可以使用通配符(wildcarded)来定义文件的名字以及函数的名字,比如:
# 所有内核中以sys_前缀开头的函数
kernel.function("sys_*)

# nginx用户进程中名为ngx_http_process_*的函数
process("/home/admin/nginx/bin/nginx").function("ngx_http_process_*")
有时候如果不确定函数的名字,那么就可以使用前面的-L和-l命令来辅助查询,比如还是上面test.c的例子:
$ sudo stap -l 'process("./a.out").function("fu*")'
process("/home/codedump/source/systemtap-examples/src/a.out").function("func1@/home/codedump/source/systemtap-examples/src/test.c:3")
process("/home/codedump/source/systemtap-examples/src/a.out").function("func@/home/codedump/source/systemtap-examples/src/test.c:7")
使用statement可以很方便定位到具体的某一行代码执行前后,变量的变化情况,比如下面这个最简单的C代码:
#include <stdio.h>

int main(int argc, char *argv[])
{
	int a;

	a = 1;
	printf("a:%d\n", a);
	a = 2;
	printf("a:%d\n", a);
	return 0;
}
使用下面这个systemtap脚本针对代码中的第8行和第10行打印当时变量a的值:
probe process("./a.out").statement("main@./cc_stap_test.c:8")
{
    printf("systemtap probe line 8 a:%d\n", $a);
}

probe process("./a.out").statement("main@./cc_stap_test.c:10")
{
    printf("systemtap probe line 10 a:%d\n", $a);
}
输出如下:
$ sudo stap cc_stap_test.stp -c ./a.out
a:1
a:2
systemtap probe line 8 a:1
systemtap probe line 10 a:2
调用时机
有了以上两个要素,已经可以在具体的函数、文件行中定义探测点了,但是有时候针对某一个具体函数,想在不同的时机定义探测点,比如函数被调用和调用返回的时候,那么可以在后面以后缀的方式定义出来:
probe kernel.function("*@net/socket.c").call {
  printf ("%s -> %s\n", thread_indent(1), probefunc())
}
probe kernel.function("*@net/socket.c").return {
  printf ("%s <- %s\n", thread_indent(-1), probefunc())
}
比如这两个探测点,分别在socket.c中的任何函数被调用以及返回的时候被调用。
异步事件
常见的异步事件是begin、end、never、timers。
- begin、end分别在脚本开始执行以及结束执行的时候被调用。
- timers用于定义定时器探测点,常见的格式timer.s(1)来定义每秒触发的探测点。
- never定义的探测点不会被调用到,很多时候加这个探测点只是为了检查一些语法错误。
这里统一用一个例子来说明:
// sudo stap begin.stp -T 2
// 输出:
// probe begin
// in timer
// probe end

probe begin {
  printf("probe begin\n")
}

probe end {
  printf("probe end\n")
}

probe timer.s(1) {
  printf("in timer\n")
}

probe never {
  printf("never do this\n")
}
以下图片简单总结探针事件的划分:

探测点别名(alias)
除了以上的探测点之后,还可以通过探测点别名技术将多个探测点的处理行为合并在一个处理函数中,比如tapset scheduler中是这么定义scheduler.cpu_off这个探测点的:
probe scheduler.cpu_off =
	kernel.trace("sched_switch") !,
	kernel.function("context_switch")
{
    name = "cpu_off"
    task_prev = $prev
    task_next = $next
    idle = __is_idle()
}
在这里,新定义的别名探测点scheduler.cpu_off将内核的两个探测点kernel.trace(“sched_switch”)和kernel.function(“context_switch”)的处理行为合并在了一起。
需要注意的是,kernel.trace("sched_switch") 这个探测点的后面加上了!,这表示这个探测点可能由于版本的差异是不存在的,但是一旦存在,那么将不再解析这个探测点以后的以,隔开的其他探测点,所以!一定用在多个以,分隔开的探测点列表中。相应地,还有?后缀,也是表示这个探测点可能不存在,但是与前面的区别是,即便存在这种探测点也不影响其他探测点的检测,所以?后缀的探测点可以独立存在。
探测点动态定义
此外,还可以根据命令行参数来指定探测点,比如:
function trace(entry_p)
{
  printf("%s%s%s\n",
         thread_indent (entry_p),
         (entry_p>0?"->":"<-"),
         ppfunc ())
}

probe $1.call   { trace(1) }
probe $1.return { trace(-1) }
这个脚本可以根据脚本中传入的第一个参数,来打印其调用情况,比如:
$ stap callgraph.stp 'kernel.function("sys_open")'

     0 nscd(23451):->SyS_open
     6 nscd(23451):<-SyS_open
     0 nscd(23451):->SyS_open
     7 nscd(23451):<-SyS_open
     0 roxterm(21323):->SyS_open
    43 roxterm(21323):<-SyS_open
     0 roxterm(21323):->SyS_open
  2604 roxterm(21323):<-SyS_open
     0 systemd-udevd(637):->SyS_open
   268 systemd-udevd(637):<-SyS_open
     0 roxterm(21323):->SyS_open
    24 roxterm(21323):<-SyS_open
[...]
变量
目标变量(Target Variables)
目标变量指的是当前代码位置可见的变量,官方文档对这个概念的解释是:
The probe events that map to actual locations in the code (for example kernel.function(“function”) and kernel.statement(“statement”)) allow the use of target variables to obtain the value of variables visible at that location in the code. You can use the -L option to list the target variable available at a probe point.
比如前面提过的,可以使用-L命令行参数,拿到一个探测点的位置及相关的变量:
stap -L 'kernel.function("vfs_read")'
kernel.function("vfs_read@fs/read_write.c:277") $file:struct file* $buf:char* $count:size_t $pos:loff_t*
在这里,给出变量相关信息的时候,是以如下格式给出的:
$变量名:变量类型
比如这里的$file:struct file*。
全局变量
如果不是在当前代码位置的变量,此时可以通过这种格式拿到:
@var("varname@src/file.c")
比如:
// test2.c
#include <stdio.h>

int g = 100;
int func1(int a, int b) {
  g = 102;
  return a+b;
}

int func(int d, const char *n) {
  int a,b,c;

  g = 101;
  a = 1;
  b = 3;
  c = func1(a,b);
  return c;
}

int main() {
  func(100, "test");
  return 0;
}
stp脚本如下:
probe process("./a.out").function("func").call {
	printf("call func:g=%d\n", @var("g@test.c"))
}

probe process("./a.out").function("func") {
	printf("func:g=%d\n", @var("g@test.c"))
}

probe process("./a.out").function("func").return {
	printf("return func:g=%d\n", @var("g@test.c"))
}

probe process("./a.out").function("func1").call {
	printf("call func1:g=%d\n", @var("g@test.c"))
}

probe process("./a.out").function("func1") {
	printf("func1:g=%d\n", @var("g@test.c"))
}

probe process("./a.out").function("func1").return {
	printf("return func1:g=%d\n", @var("g@test.c"))
}
执行sudo stap t.stap -c ./a.out得到下面的结果:
call func:g=100
func:g=100
call func1:g=101
func1:g=101
return func1:g=102
return func:g=102
打印结构体内容
有一些变量,本身是一个结构体,如果想打印其成员信息,但是又不知道结构体的成员分布的情况,可以首先使用$变量名$,比如:
$ sudo stap -e 'probe kernel.function("vfs_read").return {printf("%s\n", $file$); exit(); }'

{.f_u={...}, .f_path={...}, .f_inode=0xffff8eaf11a9ef80, .f_op=0xffff8eafef9a7100, .f_lock={...}, .f_write_hint=0, .f_count={...}, .f_flags=34818, .f_mode=491551, .f_pos_lock={...}, .f_pos=0, .f_owner={...}, .f_cred=0xffff8eafed747f00, .f_ra={...}, .f_version=0, .f_security=0xffff8eafbfb5f708, .private_data=0x0, .f_ep_links={...}, .f_tfile_llink={...}, .f_mapping=0xffff8eaf11a9f0f8, .f_wb_err=0}
这样就一目了然知道这个结构体的构成了。
而如果需要打印某个成员的信息,就可以使用->操作符,注意在systemtap中,无论是指针还是引用都使用->来查看成员:
$ sudo stap -e 'probe kernel.function("vfs_read").return {printf("%d\n", $file->private_data); exit(); }'

0
这里还有另一个知识点,即一个成员可能又是一个结构体,如果要一层一层“扒掉”成员的外衣,就需要在后面加$符号,每多一个$符号,就扒掉一层外衣,例子:
$ sudo stap -e 'probe kernel.function("vfs_read").return {printf("%s\n", $file->f_pos_lock$); exit(); }' -w
{.owner={...}, .wait_lock={...}, .osq={...}, .wait_list={...}}

$ sudo stap -e 'probe kernel.function("vfs_read").return {printf("%s\n", $file->f_pos_lock$$); exit(); }' -w
{.owner={.counter=-124589570406976}, .wait_lock={<union>={.rlock={.raw_lock={<union>={.val={.counter=0}, <class>={.locked='\000', .pending='\000'}, <class>={.locked_pending=0, .tail=0}}}}}}, .osq={.tail={.counter=0}}, .wait_list={.next=0xffff8eaf34c8cc58, .prev=0xffff8eaf34c8cc58}}

$ sudo stap -e 'probe kernel.function("vfs_read").return {printf("%s\n", $file->f_pos_lock$$$); exit(); }' -w
{.owner={.counter=-124589338874240}, .wait_lock={<union>={.rlock={.raw_lock={<union>={.val={.counter=0}, <class>={.locked='\000', .pending='\000'}, <class>={.locked_pending=0, .tail=0}}}}}}, .osq={.tail={.counter=0}}, .wait_list={.next=0xffff8eaf42b71458, .prev=0xffff8eaf42b71458}}
结合打印全局变量和打印结构体成员这两个知识点,如果想知道全局变量的结构体成员分布,就需要:
@var("全局变量名@src/file.c")$
比如:
$ sudo stap -e 'probe kernel.function("vfs_read") {
           printf ("current files_stat max_files: %s\n",
                   @var("files_stat@fs/file_table.c")$);
           exit(); }'
current files_stat max_files: {.nr_files=0, .nr_free_files=0, .max_files=774499}
然后用这个格式打印全局变量结构体成员数据:
@var("全局变量名@src/file.c")->结构体成员名称
比如:
$ sudo stap -e 'probe kernel.function("vfs_read") {
           printf ("current files_stat max_files: %d\n",
                   @var("files_stat@fs/file_table.c")->max_files);
           exit(); }'
current files_stat max_files: 774499
类型转换(Typecasting)
当指针为void*指针时,如果知道它的确切类型,可以通过类型转换来输出其信息:
@cast(p, "type_name"[, "module"])->member
在这里,type_name是类型名称,而可选的module是模块+文件信息,好让systemtap知道到哪里找到这个类型信息,比如:
@cast(tv, “timeval”, “<sys/time.h>”)->tvsec
@cast(task, “taskstruct”, “kernel<linux/sched.h>”)->tgid
@cast(task, “taskstruct”, “kernel<linux/sched.h><linux/fsstruct.h>”)->fs->umask
所以可以如下例打印:
$ sudo stap -e 'probe kernel.function("do_dentry_open") {printf("%d\n", @cast($f, "file", "kernel<linux/fs.h>" )->f_flags); exit(); }'
32768
在使用@cast转换类型之后,同样可以在后面加上$打印更多详细信息:
$ sudo stap -e 'probe kernel.function("do_dentry_open") {printf("%s\n", @cast($f, "file", "kernel<linux/fs.h>")$); exit(); }'
{.f_u={...}, .f_path={...}, .f_inode=0x0, .f_op=0x0, .f_lock={...}, .f_write_hint=0, .f_count={...}, .f_flags=32768, .f_mode=0, .f_pos_lock={...}, .f_pos=0, .f_owner={...}, .f_cred=0xffff8eafef8f80c0, .f_ra={...}, .f_version=0, .f_security=0xffff8eafeb5c09c0, .private_data=0x0, .f_ep_links={...}, .f_tfile_llink={...}, .f_mapping=0x0, .f_wb_err=0}
@cast操作符同样也可以用在应用程序中,比如:
#include <stdio.h>

typedef struct Test {
  int a;
  int b;
} Test;

int func(void *p) {
  printf("in func\n");
}

int main() {
  Test t = {.a=101,.b=102};
  func(&t);
  return 0;
}
可以如下打印:
probe process("./a.out").function("func").call {
	printf("call func:g=%d\n", @cast($p, "Test")->a)
}

/*输出:
in func
call func:g=101
*/
打印局部变量
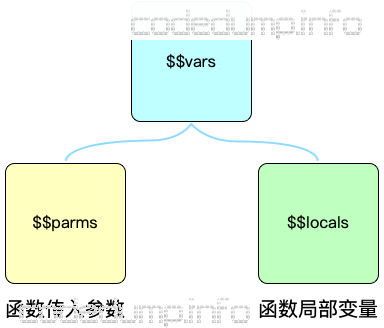
可以使用如下几个变量来打印函数局部变量:
- $$vars:打印函数的所有局部变量以及传递进来的函数参数。
- $$parms:$$vars的子集,打印函数传递进来的函数参数。
- $$locals:$$vars的子集,打印函数的所有局部变量。

同样的,在这些变量后面也可以加上$美观打印:
#include <stdio.h>

int func1(int a, int b) {
  return a+b;
}

int func(int d, const char *n) {
  int a,b,c;

  a = 1;
  b = 3;
  c = func1(a,b);
  return c;
}

int main() {
  func(100, "test");
  return 0;
}
脚本如下:
probe process("./a.out").function("func").call {
	printf("call func:vars=%s\n", $$vars)
	printf("call func:vars=%s\n", $$vars$)
	printf("call func:params=%s\n", $$parms)
	printf("call func:params=%s\n", $$parms$)
	printf("call func:locals=%s\n", $$locals)
	printf("call func:locals=%s\n", $$locals$)
}

/*
sudo stap t.stap -c ./a.out
call func:vars=d=0x64 n=0x4005c4 a=0x0 b=0x4003e0 c=0x0
call func:vars=d=100 n="test" a=0 b=4195296 c=0
call func:params=d=0x64 n=0x4005c4
call func:params=d=100 n="test"
call func:locals=a=0x0 b=0x4003e0 c=0x0
call func:locals=a=0 b=4195296 c=0
 */
另外,如果需要打印函数的返回值,可以使用$$return变量,但是要注意这个变量只能在.return中使用,毕竟既然是要打印函数返回值,就要在函数返回的时候才能知道,使用下面的脚本来看上面C程序的返回值:
probe process("./a.out").function("func").return {
	printf("call func:return=%s\n", $$return)
	printf("call func:return=%s\n", $$return$)
}

/*
$ sudo stap t.stap -c ./a.out
call func:return=return=0x4
call func:return=return=4
 */
关联数组(Associative Arrays)
准确的说,systemtap中没有数组这个概念,关联数组就是systemtap中的字典(dict)。
字典有可能是嵌套型的字典,比如C++代码中dict[keya][keyb],即一个字典中的值又是另一个字典。systemtap中的关联数组也可以做到类似的效果,但是语法略有不同,多个层级的键之间使用,分隔,比如:
bt[execname(),tid(),$mem,sprint_ubacktrace()] = 1
这段代码用C++类似表达就是:
bt[execname()][tid()][$mem,sprint_ubacktrace()] = 1
在systemtap中,最多允许嵌套9个键。
关联数组的常规操作,并无什么特别的地方,如下代码所示:
// 赋值
array_name[index_expression] = value

// 读取
delta = gettimeofday_s() - foo[tid()]

// 递增
array_name[index_expression] ++

// 删除数组中的某一项
delete array_name[index_expression]

// 删除整个关联数组
delete array_name
遍历关联数组
最简单的遍历关联数组的方式,可以使用foreach表达式:
foreach (element in array_name)
  statement
例子:
global reads

// 以进程名字为键,记录下每个进程调用vfs.read的次数
probe vfs.read {
  reads[execname()] ++
}

// 每隔3秒打印一次
probe timer.s(3) {
  foreach (count in reads)
    printf("%s : %d \n", count, reads[count])
  delete reads
}
输出:
$ sudo stap vfs-read-1.stp -T 4
stapio : 21
docker-containe : 12
dockerd : 12
gmain : 7
rtkit-daemon : 1
compiz : 6
systemd-journal : 1
gdbus : 6
upstart-dbus-br : 4
nm-applet : 3
avahi-daemon : 29
除了常规的遍历之外,foreach操作符还可以指定遍历的顺序,以及遍历的数量。
修改遍历关联数组顺序
上面的脚本文件稍作修改:
global reads

// 以进程名字为键,记录下每个进程调用vfs.read的次数
probe vfs.read {
  reads[execname()] ++
}

// 每隔3秒打印一次
probe timer.s(3) {
  foreach (count in reads+)
    printf("%s : %d \n", count, reads[count])
  delete reads
}
即在foreach所遍历的关联数组名称后面加上+,表示按照键递增的顺序来遍历数组,输出为:
$ sudo stap vfs-read-1.stp -T 4
systemd-journal : 1
indicator-datet : 3
gmain : 4
upstart-dbus-br : 5
unity-panel-ser : 6
compiz : 7
docker-containe : 12
dockerd : 12
stapio : 21
gdbus : 23
avahi-daemon : 28
相反的,如果使用-则表示是递减顺序来遍历。
限定遍历关联数组数量
除此之外,还可以在foreach操作符中,使用limit 数量来限制遍历关联数组中元素的数量:
global reads

// 以进程名字为键,记录下每个进程调用vfs.read的次数
probe vfs.read {
  reads[execname()] ++
}

// 每隔3秒打印一次
probe timer.s(3) {
  foreach (count in reads+ limit 2)
    printf("%s : %d \n", count, reads[count])
  delete reads
}
输出就只有两项了:
$ sudo stap vfs-read-1.stp -T 4
systemd-journal : 1
systemd-logind : 1
测试元素存在性
除此之外,还可以使用in操作符测试一个元素是否在关联数组中,语法如下:
if([index_expression] in array_name) statement
例子:
global reads

probe vfs.read {
  reads[execname()] ++
}

probe timer.s(3) {
  printf("=======\n")
  foreach (count in reads+)
    printf("%s : %d \n", count, reads[count])
  if(["stapio"] in reads) {
    printf("stapio read detected, exiting\n")
    exit()
  }
}
输出:
$ sudo stap vfs-read-1.stp -T 4
=======
systemd-journal : 1
rtkit-daemon : 1
nm-applet : 3
gmain : 4
upstart-dbus-br : 4
compiz : 5
gdbus : 6
docker-containe : 12
dockerd : 12
avahi-daemon : 19
stapio : 21
stapio read detected, exiting
计算统计集合(Statistical Aggregates)
常规操作
systemtap中的变量,除了具备其他语言中常见的操作之外,还有一个其他语言没有的特色,可以作为统计集合来存储数据。即一个变量,可以存储多个数据,后期可以对这个变量的数据进行常规的统计计算。
一个变量要存储统计数据,此时不能使用=来赋值,需要使用<<<操作符。比如:
global reads

probe vfs.read
{
  reads[execname()] <<< $count
}
这里的$count是内核中vfs_read函数传入的参数,存储的读取数据的数量:
ssize_t vfs_read(struct file *file, char __user *buf, size_t count, loff_t *pos)
这样,这个systemtap脚本就针对同一个进程,就把这个进程所有调用vfs_read函数的count值记录了下来。
下面来具体看看systemtap都提供了针对统计数据的哪些操作。常规的操作有以下几种:
@count(variable):返回同一个变量中存储的数据数量。
@sum(variable):返回同一个变量中存储的数据总和。
@min(variable):返回同一个变量存储的最小数据。
@max(variable):返回同一个变量中存储的最大数据。
@avg(variable):返回同一个变量中存储的数据均值。
@variance(variable):返回同一个变量中存储的数据方差。
以上的操作符,又被称为抽取函数(extractor function),即可以输入一个存有统计数据的变量,相应返回一些数据。
打印柱状图数据
还可以使用@hist_log来打印以2为底指数分布的直方图:
global histogram

probe begin {
  printf("Capturing...\n")
}

probe netdev.receive {
  histogram <<< length
}

probe netdev.transmit {
  histogram <<< length
}

probe end {
  printf( "\n" )
  print( @hist_log(histogram) )
}
输出:
$ sudo stap hist_log.stp -T 2
Capturing...

value |-------------------------------------------------- count
    8 |                                                   0
   16 |                                                   0
   32 |@@                                                 2
   64 |@                                                  1
  128 |                                                   0
  256 |                                                   0
  512 |                                                   0
 1024 |@@@@                                               4
 2048 |                                                   0
 4096 |                                                   0
除了@hist_log之外,还可以使用@hist_linear(v, start, stop, interval)来打印start-stop区间interval间隔的直方图
global reads

probe netdev.receive {
	reads <<< length
}

probe end {
	print(@hist_linear(reads, 0, 1024, 200))
}
这里打印的是分布在[0,1024],并且每个柱子的数据间间隔100的柱状图,输出如下:
$ sudo stap hist_linear.stp -T 2
value |-------------------------------------------------- count
    0 |@@@@@@@@@@@@@                                      13
  200 |@@@@                                                4
  400 |                                                    0
  600 |                                                    0
常用函数
本节来介绍systemtap中常用的一些函数。
- tid():当前线程ID。
- uid():当前用户ID。
- cpu():当前CPU编号。
- ctime():当前UNIX epoch秒数。
- pp():当前探测点的描述字符串。
- execname():当前运行的进程名称。
- probefunc():探测点函数名称。
- target():在stap使用
-c command或者-x process命令时,target()能拿到进程的pid。 - name:返回系统调用的名称字符串,仅能在syscall类型的探针处理函数中使用。
- thread_indent(delta):它可以输出当前probe所处的可执行程序名称、线程id、函数执行的相对时间和执行的次数(通过空格的数量)信息,它的返回值就是一个字符串。参数delta是在每次调用时增加或移除的空白数量。
这里其他的都好理解,thread_indent需要一个例子来说明:
probe kernel.function("*@net/socket.c").call
{
  printf ("%s -> %s\n", thread_indent(1), probefunc())
}
probe kernel.function("*@net/socket.c").return
{
  printf ("%s <- %s\n", thread_indent(-1), probefunc())
}
输出:
0 ftp(7223): -> sys_socketcall
1159 ftp(7223):  -> sys_socket
2173 ftp(7223):   -> __sock_create
2286 ftp(7223):    -> sock_alloc_inode
2737 ftp(7223):    <- sock_alloc_inode
3349 ftp(7223):    -> sock_alloc
3389 ftp(7223):    <- sock_alloc
3417 ftp(7223):   <- __sock_create
4117 ftp(7223):   -> sock_create
4160 ftp(7223):   <- sock_create
4301 ftp(7223):   -> sock_map_fd
4644 ftp(7223):    -> sock_map_file
4699 ftp(7223):    <- sock_map_file
4715 ftp(7223):   <- sock_map_fd
4732 ftp(7223):  <- sys_socket
4775 ftp(7223): <- sys_socketcall
可以看到,thread_indent()搭配.call和.return,美化输出了函数调用的流程。
以下再演示一下name的使用,这个变量仅能用在syscall类的探针中,以下脚本每隔一秒打印出当前20个被调用最多的系统调用数量:
global syscalls_count

probe syscall_any {
  syscalls_count[name] <<< 1
}

function print_systop () {
  printf ("%25s %10s\n", "SYSCALL", "COUNT")
  foreach (syscall in syscalls_count- limit 20) {
    printf("%25s %10d\n", syscall, @count(syscalls_count[syscall]))
  }
  delete syscalls_count
}

probe timer.s(1) {
  print_systop ()
  printf("--------------------------------------------------------------\n")
}
输出:
$ sudo stap syscall.stp -T 2
                  SYSCALL      COUNT
                    ioctl        127
               epoll_wait         47
                    futex         42
                 pselect6         29
                     read         28
                    write         17
                  recvmsg         16
                     poll         14
           rt_sigprocmask          8
                    fcntl          6
                   writev          5
                    ppoll          5
                 recvfrom          4
                setitimer          4
        inotify_add_watch          3
                   select          3
                nanosleep          2
          timerfd_settime          2
            clock_gettime          2
                ftruncate          1
--------------------------------------------------------------
@defined和@choose_defined
由于版本变化,有一些变量可能在新版本中不存在了,此时可以使用@define来检查变量是否存在:
probe vm.pagefault = kernel.function("__handle_mm_fault@mm/memory.c") ?,
                     kernel.function("handle_mm_fault@mm/memory.c") ?
{
  write_access = (@defined($flags) ? $flags & FAULT_FLAG_WRITE : $write_access)
}
上面的脚本根据是否存在变量flag,来给write_access不同的赋值。
此外还有@choose_defined($a,$b),其作用相当于:@defined($a)? $a : $b,例子:
probe vm.pagefault = kernel.function("handle_mm_fault@mm/memory.c")
{
  write_access = @choose_defined($write_access, 0)
}
@entry
在.return探针中,有一个特殊的操作符@entry,用于存储该探针的入口处的表达式的值,可以使用这个操作符,完成比如计算探针函数执行时间计算等工作,比如:
global sloth = 50

probe vfs.open.return {
  time = gettimeofday_us()-@entry(gettimeofday_us())
  if (time >= sloth)
    printf("%s[%d] %d %s\n", execname(), tid(), time, pathname)
}
这个脚本在vfs.open.return探针处理函数中,通过@entry操作符,计算完成vfs.open操作的时间差,如果超过设置的阈值50就打印相关信息。
嵌入C代码
systemtap中支持嵌入C代码,使用guru模式(-g参数),在“%{“和“%}“标记之间就能嵌入C代码,其中访问参数的值以STAP_ARG_+参数名的形式,而返回值以STAP_RETVALUE=xxx的形式。
%{
	#include <linux/in.h>
	#include <linux/ip.h>
%} /* <-- top level */

function read_iphdr:long(skb:long)
%{
	struct iphdr *iph = ip_hdr((struct sk_buff *)STAP_ARG_skb);
	STAP_RETVALUE = (long)iph;
%}

/* Determines whether an IP packet is TCP, based on the iphdr: */
function is_tcp_packet:long(iphdr)
{
	protocol = @cast(iphdr, "iphdr")->protocol
	return (protocol == %{ IPPROTO_TCP %}) /* <-- expression */
}

probe begin {
	printf("SystemTap start!\n");
}

probe kernel.function("ip_local_deliver") {
	iph = read_iphdr(pointer_arg(1));
	printf("tcp packet ? %s\n", is_tcp_packet(iph) ? "yes" : "no");
}
这里的read_iphdr函数,其处理函数就使用的是嵌入C代码完成。